
Reseller portal
Manage customer accounts, connect your identity provider, and apply your branding to the dashboard and visitor pages.
A reseller account can create customer accounts and provide a dashboard on its own hostname. Customers use your identity provider and see your brand name, logo, and colors. Website error pages, security checks, and Zero Trust sign-in pages inherit your branding by default.
Your account must have reseller access enabled. You also need control of your portal’s DNS records and an OpenID Connect identity provider. Keep access to your original account dashboard while you set up or change the portal.
Portal branding
- Select your reseller account in the account switcher.
- Open Reseller.
- Enter your Brand name and optional Support URL.
- Set Accent color and Background color using six-digit hexadecimal colors.
- Upload your Brand logo.
- Enter Portal hostname, such as
security.example.com. - Select Save portal settings.
The dashboard stays dark. Use a dark background and a bright accent so buttons remain readable. Logos support static PNG, JPG, SVG, and WebP files up to 2 MB. Raster images support at most 4096 pixels per side and four million pixels in total. SVG files must contain static graphics without scripts, embedded images, or external resources. If an SVG is rejected, export a static PNG instead. Without an uploaded logo, branded pages show your brand name.
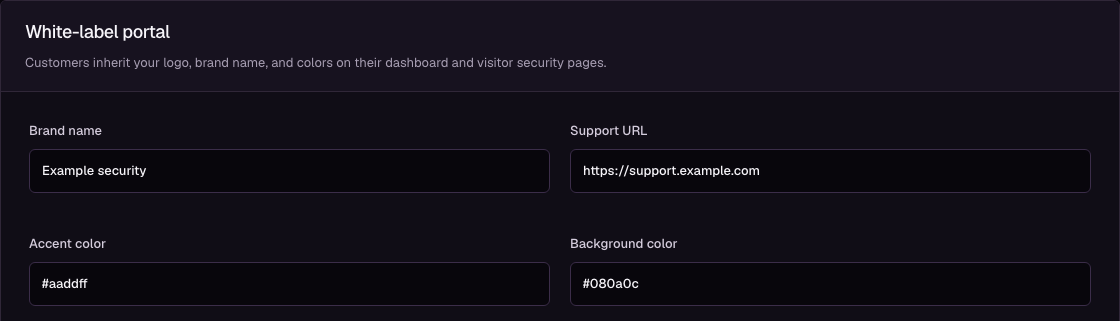
The example uses demonstration values. Enter your own hostname and brand details.
Your branding applies to existing and new customer websites. Leave individual website branding fields empty to inherit the reseller defaults. Explicit customer error-page and challenge-page text or colors remain in effect. Your logo also appears on visitor error pages and security checks. Updates reach websites after their configuration refresh.
Zero Trust account and application pages inherit the reseller name, logo, background, and support link where their own fields are empty. An uploaded account logo or a custom application page can override those defaults. See Login page.
Identity provider
The portal accepts OpenID Connect authorization code flow with PKCE S256. The provider must support discovery, RS256-signed identity tokens, and a UserInfo endpoint. Configure openid profile email scopes. Use a public HTTPS issuer; private network endpoints are not supported.
- Enter the provider’s exact Issuer URL.
- Enter its Client ID and Client secret.
- Select Token endpoint authentication to match the provider:
client_secret_basicorclient_secret_post. - Add your own provider subject under Reseller operator subjects.
- Register the exact OAuth callback URL shown under Domain connection with your provider.
- Select Enable portal sign-in.
- Select Save portal settings.
For security.example.com, register https://security.example.com/sso/callback. The provider’s discovery document is requested at the issuer URL followed by /.well-known/openid-configuration.
A subject is the exact, case-sensitive sub claim issued by your provider. It identifies a user within that issuer. Obtain it from the provider or a test sign-in token. Do not substitute an email address or display name unless it is the actual sub value. Enter one subject per line, up to 100 per list.
Reseller operator subjects grant management of every customer account and portal settings. Customer subjects grant access only to their assigned customer accounts. Use separate customer accounts when their websites or users need separate access.
Portal sessions last up to eight hours. Removing a user at your identity provider stops new sign-ins. Disable their customer account or remove their assigned subject to stop an existing portal session on the next request. Provider logout does not sign the user out of the portal; use Sign out in the dashboard.
Portal settings saves expire portal sessions, including your own branded-portal session. Sign in again after saving. Leave a client secret blank to retain it only for the same issuer and client ID. Changing either requires a replacement secret. Remove saved client secret clears it; disable sign-in first if you need to remove the secret without replacing it.
Changing the issuer disables customer access and clears customer and operator subject assignments. Add the new provider subjects and enable each customer again from your original dashboard. A client ID change can also change pairwise subject values; check your provider and update assignments before customers sign in.
Domain connection
- Add the TXT record shown as TXT name and TXT value under Domain connection.
- Add a CNAME record for your portal hostname with the displayed CNAME target,
waf-ingress.loclix.network. - Select your DNS provider’s DNS-only option if it offers proxying.
- Select Verify domain ownership.
- Wait until the portal shows Portal connected.
- Open the portal over HTTPS and test sign-in with an assigned customer identity.
Ownership verification must succeed before the portal becomes available. TLS setup continues after DNS points to the service. If the TXT record is not visible yet, check its name and value, allow DNS propagation, and retry verification. If hosting is awaiting setup or the connection remains pending, contact support with the setup message.
To change or remove a portal hostname, use your original account dashboard. A hostname change removes the previous portal immediately and requires new DNS ownership verification. Configure the new callback with your identity provider and give customers the new portal URL. To remove the hostname, clear Portal hostname, clear Enable portal sign-in, and select Save portal settings. This stops branded portal access; customer websites continue to serve traffic.
Customer accounts
- Open Reseller and select Add customer.
- Enter Customer name and Contact email.
- Set Website limit.
- Enter the user subjects under Identity provider subjects.
- Select Allow customer sign-in.
- Select Save customer.
Send the customer your verified portal URL. They authenticate with your provider and can manage websites only in their assigned accounts. Contact email is for account details and never grants access by itself. Identity-provider group membership alone also grants no access.
Use the account switcher to manage a customer’s websites. Operators can manage disabled customer accounts too. Disabling Allow customer sign-in or removing a subject stops that user’s access on their next request. Existing websites keep serving traffic.
Each reseller supports up to 100 customer accounts. Customer website limits cannot exceed the reseller limit. Your own websites and all customer websites share the reseller’s total website capacity. A customer cannot create a website if either limit is exhausted. Contact support if you need more capacity.
Resellers cannot create nested resellers or assign deployment infrastructure. Customer websites use the deployment pool assigned to the reseller. Before selecting Delete customer and Confirm deletion, remove that customer’s websites, tunnels, and Zero Trust configuration. Deletion removes customer dashboard access.
Email delivery
Portal authentication uses your identity provider. For customer application Email code sign-in, configure your own SMTP delivery under Reseller > Email delivery:
- Enter SMTP hostname, SMTP port, and SMTP encryption.
- Enter SMTP username and SMTP password if your server requires authentication.
- Enter Sender email and complete your mail provider’s sender verification requirements.
- Select Enable reseller email delivery.
- Select Save portal settings.
Use STARTTLS or implicit TLS with a valid public server certificate. Private network SMTP servers are not supported. Leave the password blank to retain it only for the same hostname, port, encryption, and username. Changing those values requires the appropriate replacement credentials. Remove saved SMTP password clears the password.
Customer email codes use your sender, brand name, and uploaded raster logo. SVG logos use the brand name in email for mail-client compatibility. Browser pages retain the SVG logo. Email-code sign-in requires your configured delivery service; it never falls back to Loclix email delivery. Check delivery outcomes under the customer’s Zero Trust > Access activity. A delivery outage prevents new email-code sign-ins; established sessions keep their normal expiry.
Public DNS targets, connector commands, and API paths retain their documented integration values. Use the exact values shown in setup instructions.